ObsDataDownloading
| StartPage | WikiPages | AdditionalFiles |


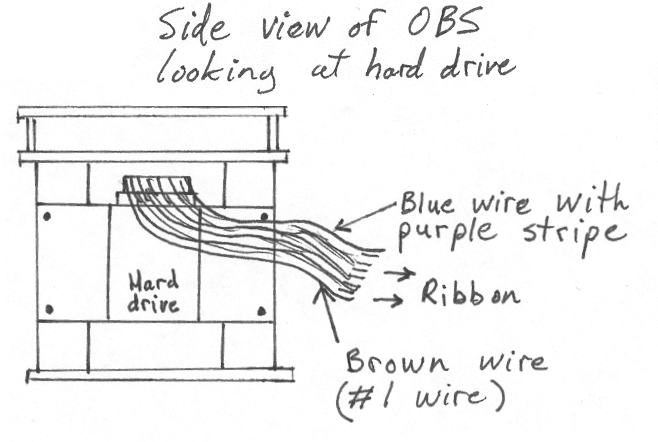
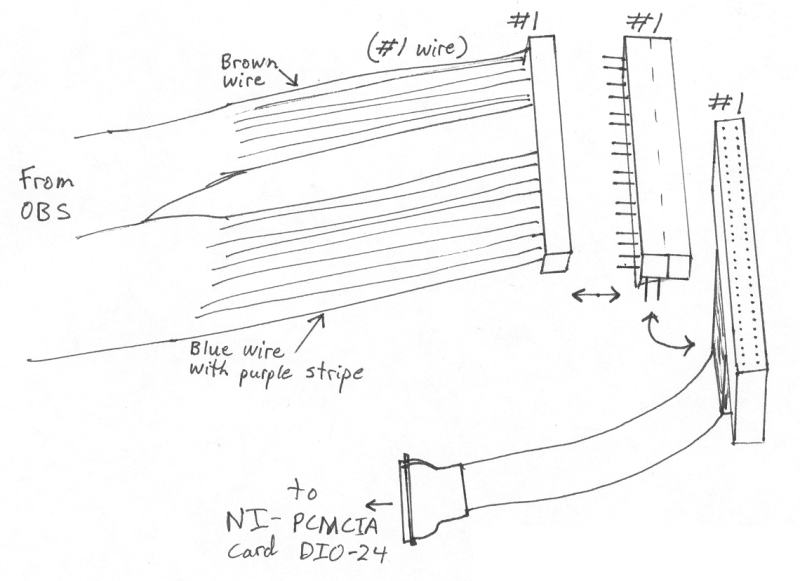
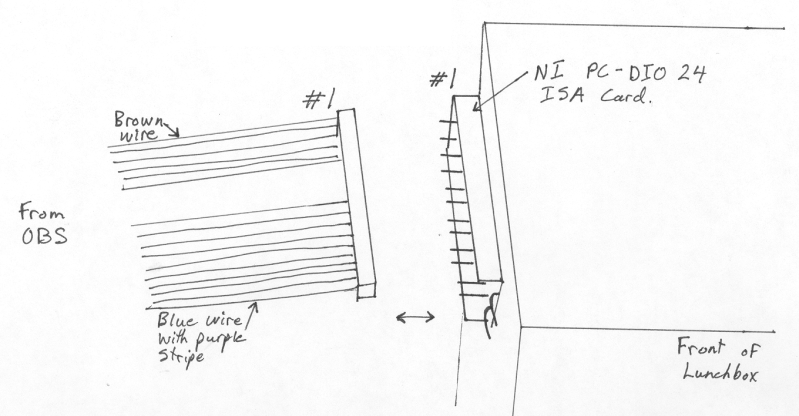
It is important to connect the cables in the proper orientation. Pin number 1 is indicated in each figure, and these are labeled on the cables. A small amount of disassembly is required to attach the downloading ribbon to the OBS, unscrewing the hard drive and front board (with the serial cable connector) will allow easy access to the connector. The other end of this ribbon has a large 40 pin connector, which can connect directly to the National Instruments ISA card (pc-dio 24).
Alternatively, an adapter and a national instruments cable can be used to connect to a National Instruments pcmcia card (dio 24). Before the download can start, some configuration is necessary with regard to the input/output port settings of the DAQ Card. The system will automatically assign these port numbers depending on the combination of PCMCIA cards that are installed in the notebook. These port settings are necessary as input for the program pc7up in order to establish proper communication. The necessary parameter can be found by clicking on Start > Settings > Control Panel > System > Device Manager > Data Acquisition Devices > DAQCard-DIO-24 > Properties > Resources
Than there will be a window saying Input/Output Range with a setting of e.g. 1400 - 141F. The first number, in this case 1400, is the number wanted for the input parameter of pc7up. This number will not change as long as one does not change any PCMCIA card. Note: this dowloading setup works in windows 95/98/ME (real DOS), but does not work in windows NT/2000/XP (emulated DOS).
Only one power connection needs to be made, it goes from the battery (or power supply) to the 5 pin connector labelled "digital battery" (12 v).
To start the download process one has to start the communication via the serial link using the program mirror. Open a DOS window and go to your working directory (c:\dobs for the IBM, and c:\util\mirror for the lunchbox). Start mirror by typing mirror, then press any key to continue, and choose profile 1 (DOBS). Note that you can only choose the DOBS profile if the configuration file dobs.xtk exists in your working directory. Press CR until you get the prompt TTZ>. If the Tattletale disk of the OBS is not on, you can activate it by typing dr + (After the download operation is finished you can turn the disk off by typing dr -). This may take more than one attempt. Other commands that are possible are: dir that will give a directory of the raw datafiles on the Tattletale. This will allow you to find out how many datafiles are written to the disk during the deployment (check the date of the files). The communication with the Tattletale can be captured by using the ESC key and typing in CA ON in the command line. After communication with the Tattletale is established you need to leave the mirror program with the F2 key. It is essential that you do not leave mirror with the normal quit command!
Note: it may take several tries to get a listing of files on the hard drive. Starting up the OBS program by typing run, then exiting, and then typing dr + seems to work well. If this fails to work, type dr - (wait a few seconds) followed by dr + and dir until dir lists the files.
The actual download of the data has to happen in the same DOS window you started mirror in. The program used for this is the (updated) version of pc7up. For easy use, Dave Heffler has written a program called doall that will help to download a set of files you can specify in the command line. The syntax is doall batchfile first-datafile last-datafile
(e.g. doall obs13 0 237)This will download all datafiles from datafile.000 to datafile.237 The batchfile is the name of a batch that actually calls the program pc7up. The batchfile (e.g. obs13.bat) contains the following two lines
pc7up -b 9600 -i 0x1400 datafile.%1
move datafile.%1 dat13
In the first line, only the -i option has to be adapted to the input/output range of the DAQ Card (see above). In the example above, the number was 1400 and that translates into -i 0x1400. A range of 1100 would require the option -i 0x1100. The second line moves the downloaded datafile into a subdirectory of the working directory, in the example to the directory dat13. Please note that you have to create this directory before the download process (mkdir name).
A DOS boot disk can be used for this step if the computer does not have DOS or win 95/98/ME installed. A DOS boot disk can be made from a windows 95/98/ME machine. Boot into DOS, and cd to the C drive (or any FAT partition). Use the same procedure as before to get a listing of files on the OBS from mirror. Exit to DOS, and run pc7up or doall to download the files.
This program needs to be adapted to the individual problem and the format the navigation and shot time data is given. Leave this to someone who is familiar with FORTRAN and with processing of navigation data. Once the program is adapted to the specific problem it can be compiled with the FORTRAN Power Station 4.0 or (as fast and simple) in a DOS window by typing fl32 shottab.for. The executable of the program will be named shottab.
The program shottab requires additional input information it will prompt you for. Alternatively (and recommended here), you can write this information in an input file. This has the advantage that you have saved the input to a file for later verification and that you can easily redo the process without retyping everything. You need to redirect the input file to the program shottab. This will be done with the < symbol. A call for the creation of the shottable would be eg. shottab <obs13.inp with the file obs13.inp containing the input information. The format of the input contains unformatted lines with parameters separated by a comma. Here is one example: expa.nav 0 z13.sht -7.762767,11.422800,12.0 90,15,9,0 93,1,11,0 2.4 290 0 90,19,45 93,0,11
The lines specify the following information: Line 1: Name of the navigation file with the shot times Line 2: Offset in meters between airguns and GPS antenna Line 3: Name of the output file (=shot table) Line 4: Latitude, longitude of OBS, reference longitude (should be within the study area and be a multiple of 3) Line 5: Julian Day, hour, minute, and second of time when OBS clock was started (Julian day is the system that counts day from January 1 = day 1 to December 31 = day 365) Line 6: Julian day, hour, minute, and second of time when OBS clock was checked for drift after the deployment. Line 7: OBS clock drift in ms (+/- means OBS clock is fast/slow with respect to GPS clock) Line 8: Delay of airgun shots in msec Line 9: Offset between OBS and ship (GPS) clock in msec (+/- means that OBS is fast/slow with respect to ship Line 10: Julian day, hour, and minute of start time for which shots should be extracted from the navigation file Line 11: Julian day, hour, and minute of end time for which shots should be extracted from the navigation file
The following information is for the older drea2sgy program. The SEGY files are created with the program drea2sgy. The program has to be run four times, one time for each seismic channel. Channel 1 is the hydrophone, channel 2 the vertical geophone and channels 3 and 4 the horizontal geophones. Start the program drea2sgy in a DOS window and answer the questions you are prompted for:
Name of the input file (here merge.dat) Name of the shot table (here z13.sht) Name of the output file (e.g. C:\OBS13\z13-h.sgy) First and last shot to process (you can get these numbers from the shot table) Y (yes, you want to use the specified sampling rate) Enter time window (typically 0 to 60 sec) N (no, there is no reduction velocity) Number of channels to process (enter 1) Channel you want to process (enter either 1, 2, 3, or 4) Save the SEGY files to CD / DAT tape using the methods described above.
Syntax is: nscu ciodrn [input-file] [output-file] vai vef [number of traces]
(Powered by PWP Version 1-4-3 )